A 3D Gene Expression Lesson on Epigenetics
Disclaimer: As far as standards go, I really like the Next Generation Science Standards. Particularly important to me is the emphasis it places on learning not just the content (disciplinary core ideas), but how scientists work/think (science practices) and connections between ideas (cross-cutting concepts). Over the last 3-4 years, I have been giving my favorite activities and labs an NGSS facelift to modify them to better fit this framework. I am going to share with you a lesson that I feel address all 3 dimensions of the NGSS.
Is your lesson “3D”? Use the NGSS Lesson Screener tool to find out. LINK
Many students really enjoy their genetics units, but one of the more difficult things to understand is gene expression. Several years ago, I would have presented my students with the “central dogma”, given some notes over transcription and translation, then worked through a few scaffolds to get them to understand how amino acid chains are produced. After reading Survival of the Sickest in 2008, I started to mention that epigenetics was a thing, though I didn’t have my students investigate it with any depth.
With the introduction of the Next Generation Science Standards, an emphasis has been placed on understanding the implications of the processes in the classic dogma without getting overly concerned about what specific enzymes might be doing at a given time. This has freed up more time to explore the regulation of gene expression, including epigenetics. There are a number of amazing resources out there (like this… and this… and this…), but here is how I cover gene regulation with my 9th grade biology students:
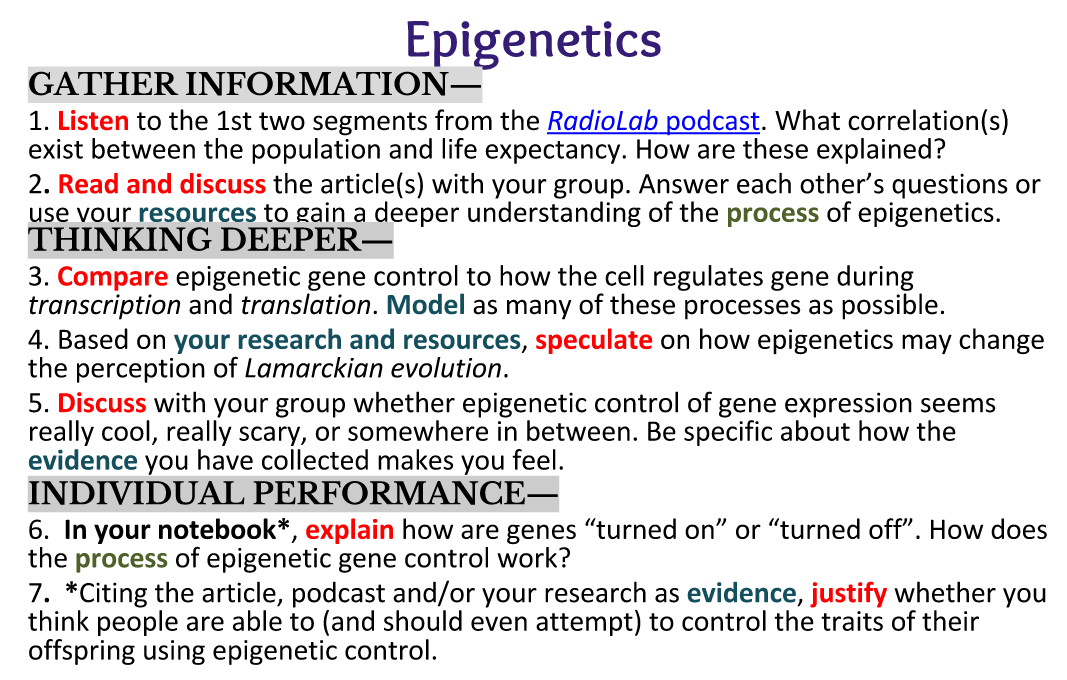
This format is something I have adapted (with few changes) from an NGSS training put on by Matt Krehbiel and Stephen Moulding, which I attended thanks to KSDE. I like this because it is flexible, provides students with the entire trajectory of the lesson from the beginning, and can double as a lesson plan. Can you guess the reasoning behind the color-coded words? That, too, is explicit, though it is in most cases more for my own benefit. RED words are commands for the students. It tells them how they should address the problem and how I will assess their work. The GREEN words relate to cross-cutting concepts (in this case, systems/system models and patterns), while the BLUE(ish) words are science practices.
Depending on how much time you have available, this could take 2 to 4 50-minute class periods (or 1-2 block periods if you’re lucky enough to roll with that schedule). I like to use more time for this because I have designed discussion and collaboration into the process, but the “Gather Information” and (obviously) “Individual Performance” sections could be done by students on their own and wouldn’t require a classroom. Devoting a little extra class time will also allow for you to conduct ad hoc informal formative assessments (read over a kid’s shoulder and ask them questions) as you move around your room.
Part 1: Gathering Information
Have you listened to the RadioLab episode, “Inheritance”? If not, you should do that. I find that RL is a good way to indoctrinate your students into the world of science podcasts. And this episode is one of my favorites.
I really like reading with my students, asking them questions that get them thinking deeper as they go, so I usually devote an entire class period to reading an article on epigenetics. I break my class into three groups with each group reading a different article, and students will (for the most part) self-select based on the length or difficulty of the reading. I use readings pulled from Discover Magazine, Nature Education, Nat Geo’s Phenomena blogs. Students sit around large tables and talk and write and sketch as they read. There is structure and agency, direction and freedom, and I love those days. But if you’re in a hurry (in my opinion, one of the worst reasons to do something), I guess you could assign the reading as homework.
via GIPHY
Part 2: Thinking Deeper
To really understand something, you need to really dig into it. This section is meant to be collaborative. If I have some really outstanding students grouped together, I will encourage them to divide the work in this section between them, then teach their group members in a scaffold. I wouldn’t normally do this with an extension/research-based activity because I want to make sure each student has a chance to interact with each aspect of the activity. If I can’t trust all the group members to produce the same quality of work, I won’t recommend the divide-and-conquer approach.
When dealing with my AP/College Biology students, I would word a question like #5 differently. With the general biology kids, I recognize most of them will not end up in a biology-centric career. They will, however, be citizens of the world, and voters. So I try to incorporate questions where they reflect on their emotional response to the content. I know it is popular to think of scientists as unfeeling, opinion-less automatons, but that is disingenuous. I live with a scientist, trust me. I use experiences like this to really emphasize the importance of evidence-based, empirical thinking and using data to drive decision-making.
Part 3: Individual Performance
How do you know if your students “get it”? A lot of the time, when using a science notebook or interactive journal, it might be several days before you go back and read everything your students wrote (and maybe, sometimes, you still don’t read everything). What I like to do is tell students they will have 15 minutes to produce the best possible answer after I give them 5 minutes to discuss with their classmates how they will address the last couple of items for this assignment. Once the writing starts, I am walking the room, reading over shoulders, and looking for patterns. Are there any things that I think they should have gotten, but most people are missing? Are we particularly strong in certain areas? Are students adding models to their answers in support? This lets me know if I need to reteach something or if we can move on.
I also look for answers that are good, but might be missing one bit of information to take it over-the-top. It is a good rule of thumb to think that, if one student is making a mistake, there are other students making the same error. I will then (not so) randomly ask students to read exactly what they have written down. By using an answer that is mostly correct, it takes some of the stigma away from making a mistake. We can then have a discussion with the class to see if we can identify where the answer can be changed or added to, and praise the parts of the answer that were done well. Students with sub-par responses are encouraged to add to their answers, and we learn more together.
Conclusion
If you are still with me, what do you think? What does this activity do well? Where can I get better? What are my students missing? If you would like to modify/use this activity, you can find a GoogleSlides version here. Send me an email (andrewising[at]gmail) or tweet (@ItsIsing) and let me know how it went!

 Previous Post
 Next Post